Hey, friend! Have you ever accidentally committed code to GitHub with your work email address? Pushed personal project code to your work repository? Or found yourself constantly switching between different settings and configurations for each project you open? 🤦♂️ I’ve been there, and yes, it’s a pain.
This post is the first in a series that will share things I have learned over the years to efficiently solve these challenges. I’ll walk you through setting up a clean, organized PowerShell development environment that keeps your work and personal projects completely separated. We’ll cover:
- Part 1 (this post)
- Creating a logical folder structure
- Path masking and shortening
- Part 2:
- Git configuration for multiple identities
- Part 3:
- VS Code profiles and extensions
- VS Code workspaces
- More?
By the end of this series, you’ll have a development setup that makes context-switching between work and personal projects seamless, reduces configuration mistakes, and might just make your daily coding life better.
Why Separate Work and Personal Projects Folders?
Before we dive into the “how,” let’s quickly review the “why.” What problems are we trying to solve?
- Privacy, Security, and Confidentiality
- don’t accidentally reveal your work or personal email address
- don’t accidentally push corporate code, information, or secrets to a public repository
- don’t backup corporate code to personal storage or personal code to corporate storage
- Productivity
- your work may use GitHub, Azure DevOps, GitLab, or other CI/CD platforms for work projects–and they each require different IDE settings and extensions
- scope your search and navigation to only include related projects
- reduce mental context switching
Many of you will rightly say the proper solution is to never mix work and personal (or public) project development on the same machine. That’s fair. Still, I will counter that there can be some legitimate crossover. In my work, frequently use open-source tools and PowerShell modules. Regularly using these tools creates many opportunities to fix bugs or add enhancements that my colleagues and I need. It’s an awesome way to make the job easier, get better results for our customers, and give back to the community at the same time!
That said, it is still critical to maintain separation between public, private, and corporate projects. In addition, each of these will often have different configuration needs when it comes to Git to your IDE.
Basically, good organization isn’t just about being neat – it’s about reducing cognitive load, being secure, and preventing mistakes.
As an added bonus, if you ever need to wipe your work machine or change jobs, having a clear separation makes that transition much smoother.
Step 1: Create a Dedicated Folder Structure
We’ll start by creating a dedicated folder structure that keeps work projects separate from personal or public code.
Bonus Tip: If you develop code on a Windows machine, using a Dev Drive can provide anywhere from 10-30% performance improvement. This would be a great place to start! See more information about Dev Drives at aka.ms/devdrive.
Step 1.1: Choose Your Base Location
First, decide where to create your base code directory and what to call it. I chose to use Code under my home directory for several reasons:
- Whether I’m using Windows, Linux, or macOS, I can reference this path the same way:
~/Codeor$HOME/Code. Both will resolve properly on any platform. - I want to keep it out of the ‘Documents’ folder:
- ‘Documents’ isn’t guaranteed to be consistent across platforms and can get caught up in OneDrive sync.
- We want to avoid OneDrive folders because:
- The path can get really long, which can create a poor experience and can eventually run into path length limits
- We would end up mixing work and personal code in a synced OneDrive account
- We want to avoid the potential for OneDrive sync issues (it happens!)
Step 1.2: Create Work and Personal Subdirectories
This is where the separation is created. Choose the directory names that work for you, but the important thing is to create subdirectories for your different contexts: a dedicated directory for personal or public projects and one dedicated to work projects.
~\Code\
├── Personal
└── Work
For me, “Personal” just means projects that don’t fall under the purview of my employer or client. It is where I put my own work as well as forks of other public repositories.
If you are a freelance worker or have multiple jobs, your base folder structure might look like this:
~\Code\
├── Personal
├── CompanyName2
└── CompanyName2
Optional: With this structure in place, you can now automatically clone all of your GitHub projects into the Personal folder with the GitHub CLI if you want to. This is optional! Just…be careful if you have a large of repository content! (The gh command below can also be filtered to skip any archived repositories.)
# An OPTIONAL script that clones all of your GitHub repos using the GitHub CLI.
gh auth login
cd ~/Code/Personal
$Repositories = gh repo list --limit 1000 --json name,nameWithOwner,url | ConvertFrom-Json
foreach ($Repo in $Repositories) { gh repo clone $Repo.url }
After a few personal and work repositories are created or cloned, it will begin to look like this:
C:\Users\SamErde\Code\
├── Personal\
│   ├── DLLPickle\
│   ├── Locksmith\
│   ├── Maester\
│   ├── PowerShell\
│   ├── PSPreworkout\
│   ├── ScriptSentry\
│   └── TheCleaners\
└── Work\
    ├── ClientAutomation\
    ├── InternalScripts\
    ├── CompanyModule\
    └── SharedTools\
Step 1.3: Shortening the Path
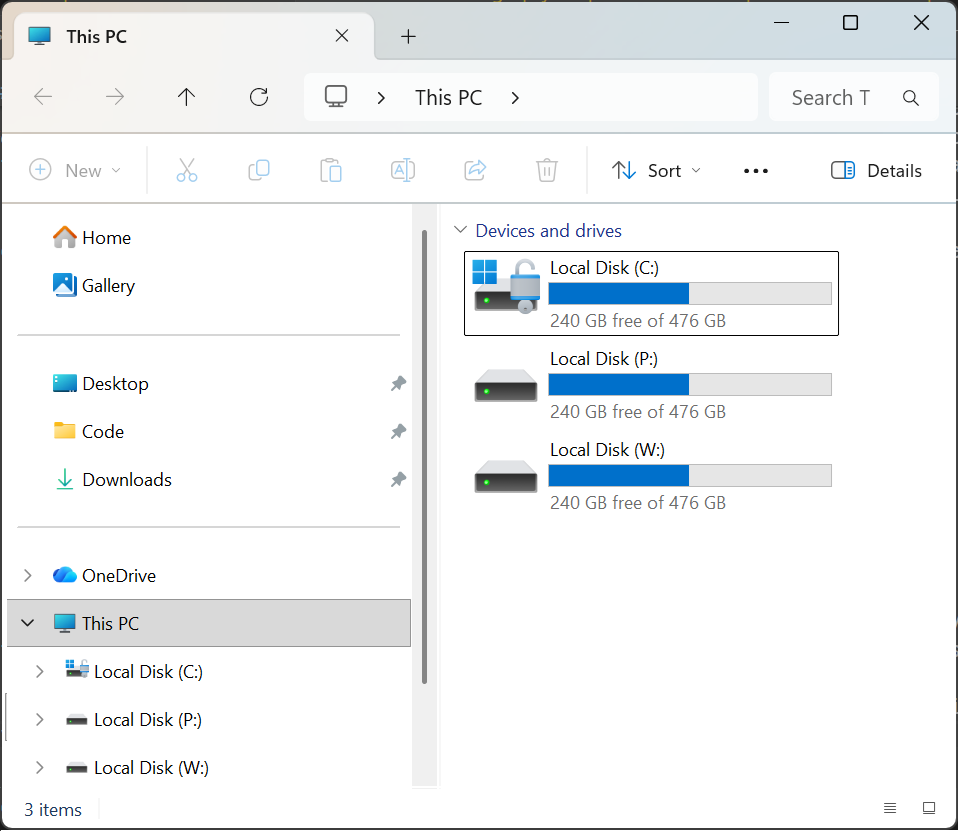
If you did not set up a dev drive, the file paths in this system can get quite long as projects grow (especially if you chose to put this in your OneDrive folder). That length can become tedious to work with and sometimes even cause problems once you get past 255 characters in a filepath. One way that you can create shorter paths is by using the subst command (or an alias in Linux) to shorten a deep directory path down to a single drive letter. You can do this for your “Code” folder or even even create separate drive letters for the Work and Personal folders. Chose the “path” (🥁😉) that works best for you!
Basic syntax: subst [<drive_letter>:] [<path>]
Here are some examples for setting up drive letters:
subst d: $HOME/Code
subst p: $HOME/Code/Personal
subst w: $HOME/Code/Work
As an added befit, this may also provide a slightly better sense of privacy by not revealing the full literal path if you ever share PowerShell screenshots or errors in a GitHub issue.
Finally, pin the location of your “Code” folder to the Quick Access list in Windows Explorer or favorites group in the Finder sidebar in macOS.
Next Steps
Now you have a clean folder structure that separates your work and personal projects. This structure is the foundation that everything else will build on. Once you have this in place, the Git configuration and VS Code tips in future posts will make complete sense.
In Part 2, we’ll dive into how to create a git configuration that automatically uses relevant commit settings for any folder in this tree.
Do you already have a folder structure for organizing your projects? What works well for you? What frustrations have you run into? Drop a comment below–I’d love to hear about your setup! In the meantime, take 5 minutes to create this folder structure if you haven’t already. Your future self will thank you. 🙏
Happy coding! 🧑💻
Sam
Photo by Yosuke Ota on Unsplash